Learning Hands-On: Breaking Cells Open & Extracting DNA
Step 1. Create salt water inside the resealable bag. In a small resealable bag, mix together 1 tablespoon of distilled or bottled waterwith ¼ teaspoon of white salt. The distilled/bottled water will help you in creating a liquid slurry of mashed up fruit, ultimately enabling you to create a suspension of separated fruit cells. It is important to use distilled or bottled water because tap water contains lots of salts and other impurities that could ruin the experiment.
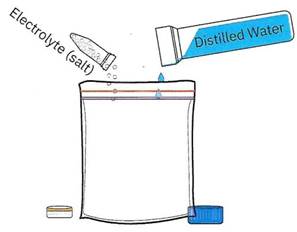
Figure 1-1. Step 1. Create salt water using distilled or bottled water
Why these ingredients? Going Deeper 1-1. Why distilled or bottled water? Lots of calcite (CaC03) and dolomite (CaMg(C03)2) are often found in tap water and as you’ll see in coming chapters, calcium (Ca2+) and magnesium (Mg2+) ions play an essential role in how DNA is regulated, driving molecular interactions, and even controlling many biochemical reactions that happen in cells. Moreover, there are often chlorine and fluoride in water for preventing the growth of bacteria and other organisms. While your DNA extraction may still work using tap water, it will work better with distilled or bottled water which has reduced ions (ions are charged atoms like Ca2+).
Why add salt? Salt is added to help the DNA stay separate from the cellular machinery and macromolecules that make up the fruit slurry. When you break open the cells in the next steps, there will be thousands of different molecules and ions floating together that will want to bind to one another in a jumble. By adding table salt, which is mostly sodium chloride (NaCl), the salt binds to and create “buffers” or shields around many of the molecules, including the DNA. Just like the bumper on a bumper car that causes you to bounce off another car during a collision salt ions become the bumpers around DNA. In other words, the salt helps keep the DNA free from binding with (sticking to) other molecules. This enables you to get a larger quantity of ‘pure’ DNA at the end of the exercise.
Step 2. Mashing the strawberry into individual cells. You will now add one strawberry (or ½ a kiwi, 1/5 of a banana) to the salt-water solution. Mash up the fruit by massaging it in the resealable bag until it is a smooth fruit slurry with no pieces or lumps. (You can keep or remove the leaves, it is your choice.) At the end of this step, the fruit cells will have been separated from each other (Figure 1-2).
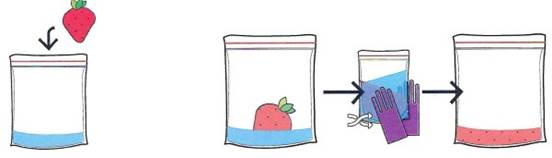
Figure 1-2 Step 2. Mash the strawberry to separate the cells that make up the strawberry
These individual cells are now “suspended” in the slurry. Most of the cells will still be intact and functioning, but some will have been torn open by the mixing.
The strawberry is made of millions of individual cells that are tightly packed together, each containing genomic DNA. By separating the cells as much as you can, it will be easier for the soapy chemicals used in Step 3 to come into contact with each cell and cut them open (Figure 1-3).

Figure 1-3. Visualizing Step 2 of DNA extraction protocol
Extracting DNA from other organisms Going Deeper 1-2. If you want to extract DNA from other organisms, similar principles are applied. You collect a sample such as a leaf, some other fruit, suspend it in a salt solution, break the cells apart, and continue the following steps in this exercise. You can even collect your cells from your mouth by gently scraping them with a utensil and depositing them into a cup or small resealable bag and follow the same procedure.
Some cells have solid outer membranes/cell walls (like yeast) and could require further chemistry or heat to be broken open. You are likely familiar with the COVID-19 virus; in this case, the genome is made of RNA (Ch. 4). Similarly, this virus can be broken open using surfactants. The RNA is then accessible for testing!
Step 3. Breaking open the cells with soap. Now we need to break the cells open, a process scientists called lysing. This process will release the DNA fron: being contained in the cell.
Add ¼ teaspoon of shampoo/soap with EDTA, also called Lysis Buffer into the fruit slurry and mix for 3 minutes. If Step 2 was not completed successfully and cells were left in clumps, lots of cells inside the clumps would be protected from coming into contact with the cutting power of the shampoo, resulting in less freec DNA. When the DNA has been released into the saltwater environment, it remains dissolved.
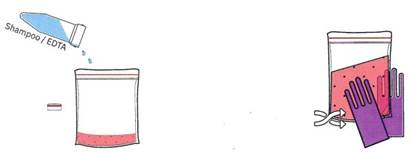
Figure 1-4 Step 3. Breaking open the cells using surfactants and EDTA
Step 4. Filtering the cell debris. You now want to separate the DNA that is still dissolved in the salt water from the rest of the cell “debris” and micelles that you are not interested in for this exercise. This debris includes the carbohydrates and lipids from the membrane of the cells, soapy micelles with cell debris, as well as clumps of proteins. Simple filtration will be sufficient to separate this debris and micelles from the dissolved DNA.

Figure 1-8. Step 4. Filtering cell debris
Set a paper coffee filter in a cup and pour your bag’s contents into the filter (Figure 1-8). Allow a few minutes for the salt water liquid containing DNA to pass through the filter. As the water, salt, and dissolved DNA pass through the filter, accompanied by some excess shampoo components, a small amount of proteins, and some colour pigments, the fruit’s remaining molecules will get caught in the filter. At the end of this step, you’ll have dissolved DNA in slightly soapy salt water in a cup. You need only – ½ teaspoon of filtered “DNA” for the next step as there is plenty of DNA in that volume of liquid. Note that if you add too much-filtered DNA liquid in the next step, the precipitation may not work as well - the next section will explain why.
You will notice that the DNA liquid looks like red water. How do you know that DNA is actually in there? Let’s make it visible using a chemistry technique called a precipitation!
Step 5. Precipitating the DNA. In this last step, you are going to use chemistry to cause the DNA to “fall” out of the solution so that it can be seen with the naked eye. This “precipitation” is one of the most commonly used techniques in chemistry. Get your kit’s empty tube and fill it with 91% to 99% isopropyl alcohol or add 2 tablespoons 91% to 99% isopropyl alcohol to a narrow glass and set it in front of you. You are about to see some chemical wizardry!
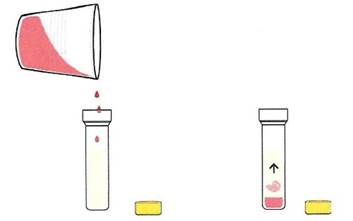
Figure 1-9. Step 5. Pour a small amount of filtered DNA into the isopropyl alcohol
If you look at the liquid that passed through the filter, which scientists call the filtrate, you will notice it is clear and tinted red thanks to some red pigment from the strawberry that remained in the salt water. You cannot see any DNA, can you? To make the DNA visible, pour a small amount of the filtrate (- 1/2 teaspoon) containing the DNA into the isopropyl alcohol tube or glass. As you pour, you will begin to see the DNA precipitate out of solution. After a minute you’ll see a white stringy glob of DNA. It may even end up floating to the surface!
Date added: 2023-11-02; views: 1627;