Energy from a Lemon
The purpose of this activity is to make a simple battery from two pieces of metal and a lemon, and to use several such batteries to power an electrical device. The project shows that two metals can react with an electrolyte — in this case, the citric acid in a lemon—to produce an electric current.
What you need: To carry out this activity, you will need three lemons; a sheet of copper or some ½ -inch (12-millimeter) copper tubing; a piece of thin cardboard; aluminum foil; some thin, insulated copper wire; metal paper clips; a button-battery powered LCD (liquid crystal display) clock; electrical tape or adhesive tape; a table knife; and scissors.
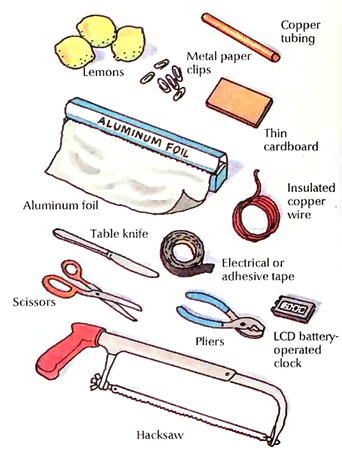
Caution: Depending on what form of copper you use, you will need to use tin snips, or a hacksaw and pliers. You should use these tools only under the supervision of an adult, or you should ask an adult to prepare the copper pieces for you. Copper can be sharp or jagged after being cut and must be handled carefully.
What to do: 1. Use scissors to cut the cardboard into three strips about 2 inch (12 millimeters) wide and about 2 inches (5 centimeters) long. Wrap aluminum foil around the cardboard strips.
2. If you are using a copper sheet, use tin snips to cut three strips about ½ inch wide and about 2 inches long. If you are using copper tubing, use a hacksaw to cut three 2-inch long pieces of tubing. Use pliers to squeeze one end of each section of tubing flat.
3. Cut two pieces of copper wire about 6 inches (15 centimeters) long and two pieces about 12 inches (30 centimeters) long. Have an adult strip about ½ inch of insulation from each end of each wire.
4. Squeeze the lemons gently without breaking the skin. You may do this by rolling them on the table with the palm of your hand. Squeezing breaks some of the tiny sacs inside the lemon that hold its juice. Cut two parallel slits about an inch apart in each lemon with the table knife.
5. Insert an aluminum-covered strip into one of the slits in each of the lemons. Insert a copper strip, or the flattened end of a piece of copper tubing, into the other slit in each lemon. The pieces of metal will be the terminals of your lemon batteries. Be sure that the two metals do not touch inside the lemons.
6. Use paper clips to attach a stripped end of each of the two short wires and one of the long ones to the aluminum-covered strips. Be sure that the metal of the wire is touching the metal of the strip.
7. Line the lemons up and use paper clips to connect the free ends of the short wires and one end of the unused long wire to the copper pieces as shown in the illustration.
8. Open the battery compartment of the clock and observe the position of the battery before you remove it Make a note of which side of the battery is marked with a plus sign (+). Use tape to connect the long wire attached to the piece of copper to the clock's positive terminal, the metal part that had been touching the side of the battery with the plus sign.

Additional activities: A single lemon battery produces about 0.5 volt. Most small flashlight bulbs require about 2.4 volts to light brightly. You can light a flashlight bulb by connecting additional lemon batteries to the series. By using a total of four or five lemon batteries, you should be able to light the bulb when you touch one of the two free wire ends to its base and the other to its side.
You can perform the original activity using other kinds of citrus fruits, such as grapefruit, limes, or oranges. How many of each of these fruits do you need to use to power the clock? The weaker the acid is in the fruit, the more fruit batteries will be needed to make the clock work
9. Use tape to connect the long wire attached to the aluminum-covered strip to the clock's negative terminal, the metal part that had been in contact with the other side of the button battery.
It will take a while for the reaction to produce a high enough voltage to run the clock. If the clock does not begin running within a minute, check to make sure that the bare copper wire is in contact with the metal of each of the terminals on the lemons and on the clock.
Date added: 2022-12-31; views: 1510;